A successful aerospace paint job can be likened to a recipe. It requires the correct ingredients, the exact amounts, and the right tools to produce the perfect finished product. There are certain chemistries involved that require proper mixing and application techniques – if they are altered, the results won’t be pretty.
Your keys to success are planning and preparation. Review the instructions on the Technical Data Sheet (TDS) carefully, read the Safety Data Sheet (SDS) before using the products, and practice cleanliness, good housekeeping, and precision when applying your paint products. Also make sure to have your spray gun equipment manual handy to ensure the correct settings are used for optimum performance.
Learn the following key terms to avoid any paint defects, and your aircraft will have that smooth, glass-like finish you are looking for.
Flash Time - There is a window of time referred to as “flash-time” that is required for the paint to gas off and dry.
The following conditions all play a role in determining flash time:
- The amount of paint
- The number of coats
- Type of paint or coating
- The temperature in your hanger or paint booth
To test the dryness of a surface, go to a part of the aircraft where there is already paper or tape. To test the tackiness of the paint, take a piece of tape and check to see that you have the same resistance between coats as touching the back side of a piece of tape. If you do not have that same resistance, it is not time to apply another coat of paint that part yet.
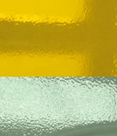
Orange Peel – Orange peel refers to the appearance of a bumpy surface and is one of the most common paint defects. One of the major ways to avoid orange peel is spraying an even, wet coat with enough paint to cover the surface.
Reasons for Orange Peel and Tips for Prevention
- The gun is too close to the surface
- Review your equipment manual to make sure you have the correct gun to part distance that your spray gun requires
- Air pressure on the spay gun is incorrect
- Make sure the air pressure it not too low and properly adjusted
- Viscosity (thickness) of the paint is too high, leaving too much paint on the surface
- Check proper mixing of paint and confirm by checking viscosity
- Using the wrong size gun tip
- Review your TDS and follow the spray gun tip recommendations
- Incorrect selection of solvent
- Make sure to use the correct activator per temperature you are working with as stated in the TDS
- A forced drying method was used to speed dry time
- Do not take any shortcuts to speed drying time
- Too little flash-time between coats
- Follow the TDS and take current temperatures into consideration when reviewing flash-time requirements
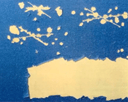
Poor Adhesion and Lifting– This is one of the most visible paint defects and harms the branding and integrity of your aircraft.
Reasons for Poor Adhesion and Tips for Prevention
- Improper cleaning and preparation of the surface to be finished
- This can be avoided by making sure your surface is clean and chemically compatible with the paint, and the surface has been prepared per aircraft specifications
- Spray equipment or air supply is contaminated
- Create and follow maintenance schedules for cleaning your equipment
- Noncompatible systems or adding non-approved components
- Use the right primer or activator as stated in the TDS, and make sure the product is compatible with the topcoat
- Insufficient surface sanding
- Properly sand all surfaces thoroughly and evenly for each application
- Insufficient flash-off times
- Make sure the flash-off window is followed to ensure the product had enough time to gas-off and dry before applying your next coat
- Exceeding stated re-coat window without reactivation
- Reference the TDS and temperature to identify the window of time before your surface locks up, or else you will need to sand or scuff. Temperature affects the re-coat window and is very important. When in doubt, scuff the panel and save yourself the re-work.
- Improper thinning of the coating material, selection of the wrong grade reducer, or improper mixing of materials
- Use approved products and mix per manufacturers recommendations as stated on the TDS
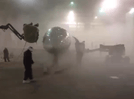
Overspray – Overspray, or dry spray is when the paint from the gun lands on the plane, leaving a haze and a poor texture.
Reasons for Overspray and Tips for Prevention
- The spray gun is too far from the surface
- 12-18 inches is the optimal gun to part distance, but it always depends on the product being used
- The air pressure is too high (over atomization) and the paint hangs in the air and falls down on the surface creating a gritty texture
- Reference the pressure recommendations on the TDS and refer to the equipment manual to confirm the correct set up
- The painters aren’t working in unison
- When working on a large aircraft, make sure all lifts and painters are working together at the same time
- There is poor airflow or poor ventilation in your workspace
- Make sure to have proper ventilation
- Make sure that there are not too many painters working in the same area where overspray can occur
- The paint is not mixed correctly per the TDS recommendation
- Make sure to follow proper mixing guidelines on the TDS. Many painters will add more thinner to make the paint lay down flatter and this creates overspray
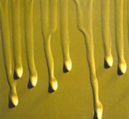
Sags and Runs – This means that the paint ends up running and dripping as the result of too much paint being applied to the area.
Reasons for Sags and Rungs and Tips for Prevention
- Addition of too much thinner
- Adding too much thinner to make paint lay smoother increases your chances of sags and runs. Follow the TDS for mixing recommendations
- High film build on overlaps
- Be careful not to lose track of where you started painting
- Gun to part distance too close
- Make sure to use even dispensing
- Incorrect fluid tip, needle, or air-cap (poor atomization) to apply more paint at once
- The TDS has guidelines to give you a range of needle sizes that has been tested to make sure you get the highest quality paint job out of that needle size
- Use a spray pattern test sheet
- Uneven fan pattern
- Make sure your equipment has been cleaned to ensure an even application
- Insufficient flash-time between coats
- Because flash-time/drying-time depends on temperature and humidity, you need to take your time and wait for the paint to dry before applying the next coat
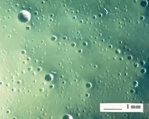
Cratering and Fish Eyes – This is caused by surface contamination, or solvent evaporation and can be noticed right when you start painting.
Reasons for Cratering and Fish Eyes and Tips for Prevention
- Not properly stirring or shaking the paint
- If your paint is sitting on a shelf for a while, the solvents may separate and proper stirring and shaking of the paint is needed to combine the product
- Solvent, evaporation leaving contamination on the surface
- Make sure your surface is clean and compatible with your paint system
- Compressed air containing oil, grease, water, or contaminated equipment
- Have a maintenance schedule for your equipment and ensure hoses are replaced and cleaned to prevent contamination and ensure the air compressor is clean, and that there was no oil, grease, or water in the equipment
- Do not use your spray equipment for anything other than the paint job you are working on, or leftover product will contaminate your new paint job
- Use paint gun cleaners, acetone, MEK, etc
- Airborne contamination
- Be wary of air conditions and outside construction (asphalt paving, etc) that could contaminate your filtration system in the hanger. Change your air filters on a regular schedule
- Poor cleaning/degreasing
- Use the wipe on wipe off method: use a clean rag to wipe off everything off your surface with solvent, and a dry rag to wipe off. Change out your rags very often.
- Use of waxes or sealant and adhesives containing silicones
- Contamination from skin contact after cleaning
- You will want to make sure you use gloves after cleaning the surface to prevent contamination from skin contact. Never use your bare hands to remove tape or touch the aircraft surface after cleaning
- Not degreasing before sanding
- Clean the aircraft completely prior to painting and degrease before spraying. Chemically strip the aircraft down to bare aluminum before sanding, or else you will be sanding any contaminants into the surface deeper into the paint grooves
- Use the water-based AkzoNobel Ultra Prep Surface Cleaner to remove contaminants prior to paint. This is helpful for removing handprints
- Dwell time exceeded prior to painting
- You’ve exceeded the time frame of letting the paint sit

Poor Opacity and Hiding – Hiding means that you can see through the coat of paint, and is affected by poor lighting in the hanger and inability to see areas of the aircraft that are in the shadows.
Reasons for Poor Opacity and Tips for Prevention
- Adding too much thinner
- Use the TDS recommendations to properly mix your product. Adding thinner to achieve a smoother appearance can result in poor opacity
- Follow the induction time (15-30 mins) where the paint molecules mix to create the final product to ensure viscosity and consistency in which it sprays becomes uniform
- Not stirring or shaking the material sufficiently to achieve total disbursement
- This can be prevented by having a proper induction time where the paint molecules mix and become a uniform material. You’ll also want to apply the recommended number of coats before using hiding stickers, and put these on tape or paper, NOT metal. Another solution for poor opacity is determining if a white undercoat is applicable to your paint job.
- Low film thickness
- Use Hiding Stickers to make sure you are applying enough paint during each coat and make sure the aircraft surface is properly covered. Hiding Stickers will save rework. Put them on paper or tape, NOT metal in areas that are hard to get to.
- Determine if a White Undercoat is applicable. Some paint manufacturers call for a white undercoat to cut down on the number of coats needed for true hide and give you the true color faster.
- Poor spraying pattern resulting in irregular layer thickness
- Take your time to spray and use the proper equipment to reach all areas of the aircraft
- Incorrect gun set-up causing over atomization
- Review your equipment manual to make sure you are using the proper settings
- Flash-time between coats is too short
- Certain colors may have different opacity effects, like reds and yellows. Make sure to follow the TDS for the correct flash-time and amounts/coats needed for each color.
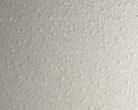
Reasons for Solvent Pop and Tips for Prevention
- Too high absolute humidity and the solvent can’t evaporate
- Monitor conditions in your hanger and paint in the proper temperatures to make sure the temperature conditions can allow for solvent evaporation
- Have a maintenance schedule for your air compressor to avoid high heat creating moisture in your air tank
- Too high air flow
- Make sure the air flow conditions in your hanger are not causing the solvent to evaporate too quickly
- Too high film thickness
- Maintain correct gun to part distance and make sure there is not too much paint being applied at once, causing the solvent to be trapped in the paint
- Insufficient flash-times and inconsistent coats
- Be aware of the changing flash-times based on the activator and temperature humidity profile
Other tips for prevention are degreasing your aircraft before spraying and using the proper thinner as stated in your TDS.
As we discussed earlier, have the TDS, SDS, and mixing guides for the products you are using printed out or available to you at all times to make sure the right instructions and recommendations are followed. Educate yourself on the activators, thinners, and mix-ratios that need to be followed for the paint job. Understand the temperature conditions you are working with and learn the different activators and ways you can use your equipment to create a great paint job in any condition. Many activators are available including high-temp, touch-up, cold-weather, and standard activators to act differently for each condition you are working with.
Because not all spray equipment is the same, it’s crucial to conduct a spray pattern test to ensure you are working in the best range for the equipment settings. Spray Pattern test sheets were developed by AkzoNobel to verify how your equipment is working with the paint prior to applying to the aircraft. This is also a helpful tool to avoid rework and hold your painters accountable.
These test sheets test if the needle size is correct, if the right gun is being used, the paint has been mixed properly, and that the viscosity is correct using the following test methods:
- Vertical Spray Pattern Check
- Helps determine the quality of the gun’s fan pattern and if it is set correctly
- Single Dynamic Pass
- Determines the right needle size and if the paint is mixed properly to determine the quality of the atomization
- Horizontal Runoff Check
- Helps determine if the fan is distributing the atomized paint evenly
- Coverage and Appearance Check
- Helps determine the hiding requirements of the product you are using
.png)